

The right moka pot grind size is medium-fine, closer to fine sand than to table sugar, and noticeably coarser than the powdery grind you’d use for a portafilter espresso machine. That’s the whole rule. Anything ground fine enough for a 9-bar espresso machine will choke a moka pot, which runs at a fraction of that pressure. Start medium-fine, brew, taste, and move the grinder one click at a time until the cup balances.
TL;DR:
- Use a medium-fine grind size roughly between 360 and 660 microns, similar to fine beach sand, to prevent choking and ensure balanced extraction.
- Adjust your grinder in small increments based on brew time, flow, and taste, aiming for a 4 to 5 minute extraction with deep amber flow.
- Avoid tamping or pressing the coffee grounds in the basket, as it increases resistance and risks clogging or safety hazards.
- Dark roasts tend to produce more fines, requiring coarser settings, while lighter roasts may need finer grind adjustments to balance acidity and extraction time.
- Burr grinders are strongly recommended for consistent particle size; blade grinders often produce uneven grounds that impair moka pot brewing.
Table of Contents
- What Does “Medium-Fine” Actually Mean for Moka Pot Grind Size?
- How Do You Dial In Moka Pot Grind Size Step by Step?
- How Much Coffee Should You Load for Your Moka Pot Size?
- Do Light and Dark Roasts Need Different Moka Pot Grind Settings?
- Your Moka Pot Is Bitter, Weak, or Clogging: Quick Fixes
- Publisher Expertise and Practical Proof: How Purelight Coffee Supports Better Moka Brews
- Why Is Espresso-Fine Grind Wrong for a Moka Pot?
- Should You Tamp or Pack Coffee in a Moka Pot?
- Does Grind Size Change Anything Beyond Bitter or Weak Coffee?
- Does Bean Freshness Affect the Ideal Grind Size?
- What Grinder Should You Use for Moka Pot Coffee?
- When Precision Matters and When It Doesn’t
- Choose Whole Beans for Your Moka Pot
- Sources
- FAQ
What Does “Medium-Fine” Actually Mean for Moka Pot Grind Size?
“Medium-fine” is vague until you attach numbers to it. A workable particle-size target for moka pot coffee grind is roughly 360 to 660 microns, which sits between drip coffee and true espresso grind. Picture fine sand at the beach, not flour, and not the coarse gravel look of French press grounds.
That microns range gives you a target, but most home brewers dial in by setting number, not a micrometer. Here’s roughly where common grinders land for moka pot brewing, treated as a starting point rather than gospel, since burr geometry varies by model:
- Baratza Encore or similar flat-burr grinders: around 15 to 20 on the dial, adjusted from there.
- Timemore or other manual hand grinders: roughly 8 to 12 clicks in, depending on the specific model’s click range.
- Conical burr grinders (Encore ESP, Virtuoso): slightly finer than their drip setting, one full step coarser than their espresso setting.
Statistic Callout: Moka pots brew at approximately 1 to 2 bars of pressure, compared to roughly 9 bars for a standard espresso machine. That gap is the entire reason the grind has to be coarser.
Run your fingers through the grounds before you load the basket. You’re looking for a texture with a slight tendency to clump when pinched, but nothing close to the sticky, flour-like consistency of espresso grind. If you’re using a blade grinder, understand its limits going in: blade grinders chop unevenly, leaving a mix of dust and boulders in the same batch, which means part of your coffee bed over-extracts while another part under-extracts. A burr grinder, even an inexpensive manual one, solves that inconsistency far better than any blade grinder can.
How Do You Dial In Moka Pot Grind Size Step by Step?
Dialing in isn’t guesswork if you follow a routine and pay attention to two things: how the stream behaves and how long the brew takes.
Start with this baseline recipe: a 1:10 coffee-to-water ratio by weight, medium heat on the stove (not high), and the water filled just below the safety valve. Load the funnel basket level with grounds and settle it with a light tap on the counter. Never press or tamp it down.
- Start at medium-fine. Use the fine-sand texture as your visual check before you even turn on the burner.
- Brew on medium heat and time it. You want a steady main flow lasting around 4 to 5 minutes once the coffee starts moving into the upper chamber.
- Watch the color and sound. The stream should run a deep amber, thin, and continuous, not blonde and gushing, not thick and sputtering from the start.
- Pull it off the heat before aggressive sputtering. That sputtering signals the tail end of extraction, and that phase pulls out bitterness you don’t want. Cutting the brew short of it is one of the single most effective fixes for a harsh moka cup.
- Taste and adjust. If the coffee tastes sour, thin, or the brew finished suspiciously fast, go one click finer next time. If it tastes bitter, burnt, or the pot gurgled and struggled to push water through, go one click coarser.
- Repeat with only one variable changed at a time. Don’t adjust grind and dose in the same brew, or you won’t know which change caused the result.
Pro Tip: Preheating your water before you fill the bottom chamber shaves a minute or two off total brew time and reduces the metallic, overcooked taste that comes from prolonged direct heat on the aluminum base.
A few secondary levers matter here too. Swapping to a darker roast usually means you’ll shift coarser on the next round, covered in more detail below. And if you’re switching between a moka pot and a drip or pour-over setup with the same grinder, expect to move the dial by several settings each direction, not just a click or two.
How Much Coffee Should You Load for Your Moka Pot Size?
Dose and ratio decide almost as much of the final cup as grind size does, and the two interact directly: a finer grind combined with a heavy dose creates far more resistance than either variable alone.
Two starting ratios cover most preferences. A 1:10 ratio by weight produces a cleaner, more diluted cup closer to filter coffee in strength. A 1:7 to 1:8 ratio produces the bolder, syrupier result most people associate with stovetop coffee. Neither is more correct. It’s a matter of taste.
If you don’t own a scale, filling the funnel basket level with grounds and leveling it off with a finger swipe will land you close to these ratios automatically, since moka pot baskets are sized to match their water chamber. Approximate dose by pot size looks like this:
- 3-cup moka pot: around a moderate amount of coffee appropriate for the moka pot size.
- 4-cup moka pot: around a moderate amount of coffee appropriate for the moka pot size.
- 6-cup moka pot: around a moderate amount of coffee appropriate for the moka pot size.
- 9-cup moka pot: around a moderate amount of coffee appropriate for the moka pot size.
The fill-level rule matters more than the exact gram count. Fill the funnel to the rim, level it off, and stop there. Never mound the coffee above the basket’s edge and never press it down, since a mounded or packed bed forces water to find the path of least resistance, usually up the sides, which pulls an uneven, often weak-tasting cup regardless of how well you dialed in the grind.
Do Light and Dark Roasts Need Different Moka Pot Grind Settings?
Roast level shifts your target grind more than most home brewers expect, and it’s the most common reason a “correctly” dialed-in grind still tastes off on a different bag.
Dark roasts fracture more during roasting and produce a higher volume of fine particles, or fines, at any given grinder setting. Those fines pack tighter and choke flow through the moka pot’s filter and basket, which is why dark roasts generally need a slightly coarser setting than light roasts to keep water moving at the same rate.
- Dark roast, tastes bitter or ashy, brew took longer than 5 minutes: step one to two clicks coarser.
- Light roast, tastes sour or thin, brew finished in under 3 minutes: step one click finer.
- Oily or brittle beans (common with darker roasts): expect more fines regardless of setting, so lean coarser as a starting default.
Pro Tip: Keep a small notebook or phone note logging grind setting by bag and roast level. Beans change enough between roast profiles that “my usual setting” stops being reliable the moment you switch bags.
Your Moka Pot Is Bitter, Weak, or Clogging: Quick Fixes
Most moka pot complaints trace back to one of four causes, and matching the symptom to the fix saves you a dozen wasted brews.
- Bitter, harsh, or ashy taste: grind is too fine or the brew ran too long. Coarsen one click and pull the pot off heat earlier.
- Weak, watery, or sour taste: grind is too coarse or dose is too light. Go one click finer, or check that the basket was filled level, not underfilled.
- Pot gurgles, sputters early, or barely produces coffee: likely clogging from grind that’s too fine or grounds that were pressed down. Coarsen the grind and confirm you didn’t tamp.
- Brew takes far longer than 5 minutes: usually too fine a grind combined with too much dose; address both, one at a time.
Statistic Callout: Burr grinders produce meaningfully more uniform particle sizes than blade grinders, and that uniformity directly affects consistency between brews. If your grind setting hasn’t changed but your results have, an inconsistent grinder is a more likely suspect than user error.
Before you blame the grind at all, rule out the basics: is the water reaching a rolling boil zone too fast on high heat, is the gasket seal worn out, and is the pot actually clean? A moka pot with old coffee oil buildup in the funnel or a cracked gasket will misbehave no matter how carefully you’ve dialed in the grind. And regardless of what’s going wrong, manufacturer guidance from Bialetti is explicit on one point: never press the grounds down. Tamping is an espresso habit that actively hurts moka pot extraction.
Publisher Expertise and Practical Proof: How Purelight Coffee Supports Better Moka Brews
For a moka pot, choose whole-bean coffee and grind it for your pot. Our roasting partner in Bend, Oregon supplies the roast and origin details on Purelight coffee pages. Review our Shipping Policy when planning an order.
Cupping scores on blend pages describe component coffees, not a separate score for the finished blend. See Sourcing & Testing for details. Purelight K-Cup-compatible pods require a compatible pod brewer and are not designed for a moka pot.
Why Is Espresso-Fine Grind Wrong for a Moka Pot?
Espresso machines force water through the grounds at close to 9 bars of pressure. Moka pots rely on steam pressure from the boiling water below, which tops out at roughly 1 to 2 bars. That’s not a small gap. It’s the difference between a mechanism designed to force water through a compacted, flour-fine puck and a mechanism that just barely pushes hot water upward through gravity and mild steam pressure.
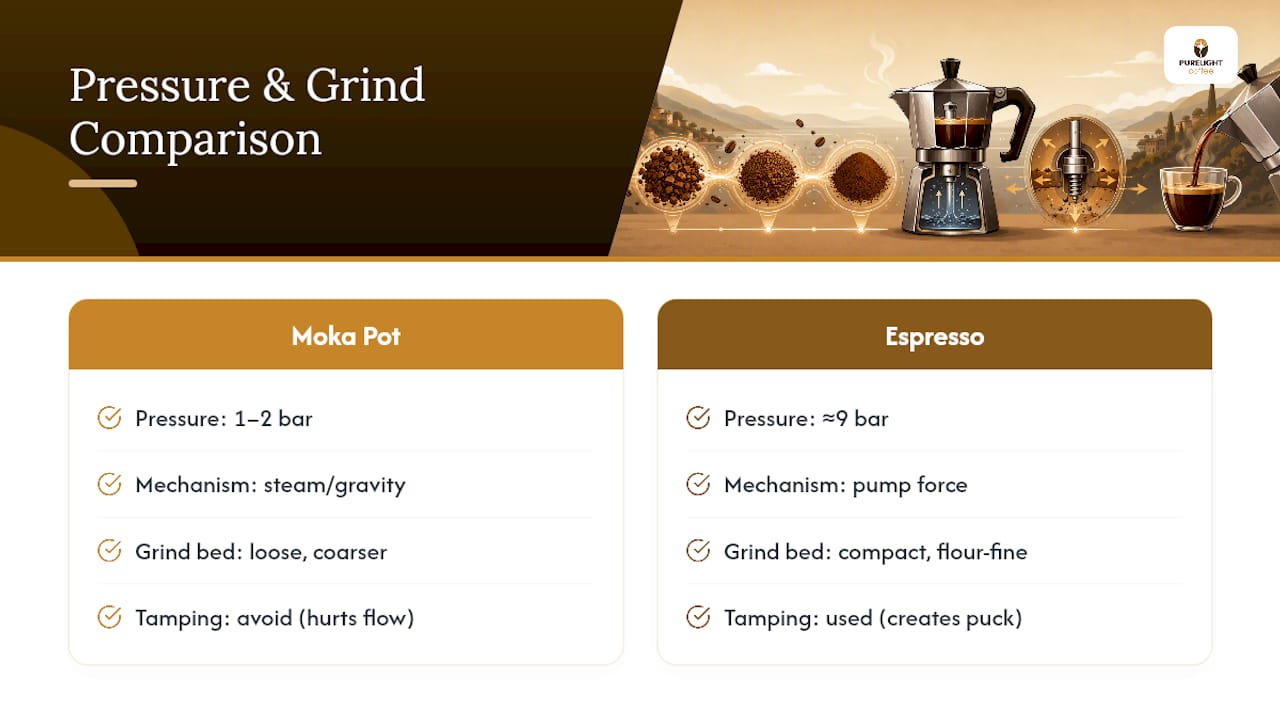
Load an espresso-fine grind into a moka pot and you’re asking a low-pressure system to do a high-pressure system’s job. The fine particles pack together almost like wet sand, and the moka pot’s modest pressure can’t push through fast enough. What usually happens next is one of two failure modes: the pot stalls and barely produces coffee, or it eventually forces water through unevenly, pulling a scorched, bitter, over-extracted cup while also risking a dangerous pressure buildup in the boiler chamber.
This is also why tamping, a habit borrowed straight from espresso, actively works against a moka pot. You’re already using a grind coarser than espresso. Compress it further with a tamper and you’ve recreated the exact resistance problem the coarser grind was meant to avoid. Read more on the pressure differences between moka pots and espresso machines if you’re coming from an espresso setup and wondering why your usual settings feel completely wrong on a stovetop pot.
Should You Tamp or Pack Coffee in a Moka Pot?
No. This is worth stating plainly because so many people carry the habit over from espresso without thinking about it. Moka pots have no mechanism to overcome the resistance that tamped or packed grounds create.
Fill the funnel basket to the rim, then run a finger or the flat edge of a spoon across the top to level it off. That’s the entire packing process. No pressing, no tapping the basket down to compact it, no mounding extra coffee above the rim and pushing it flat.
The reason ties directly back to pressure. A moka pot generates flow from steam pressure below the coffee bed, and that pressure has almost no margin for extra resistance. Pack the bed tight and you force the boiler to build far more pressure than the seals and safety valve are designed for before water finally breaks through, which is exactly the clogging and sputtering behavior most troubleshooting guides warn against. It’s also a safety issue, not just a flavor one, since a badly clogged moka pot can build pressure faster than its valve releases it.
If your grind setting is right but the coffee still won’t flow, the packing technique, not the grinder dial, is usually the actual problem. Loosen how you’re filling the basket before you touch the grind setting again.
Does Grind Size Change Anything Beyond Bitter or Weak Coffee?
Bitterness and weakness are the extremes. The more interesting changes happen in the middle ground, where a one-click adjustment shifts the character of the cup without pushing it into a clear “flaw” category.
A grind that’s a hair finer than your ideal setting, without tipping into full bitterness, tends to emphasize body and lower, chocolate or nutty notes at the expense of brighter acidity. A grind a click coarser than ideal, without going all the way to weak or sour, often opens up more of the coffee’s fruit or floral character but thins out the mouthfeel. Neither is wrong. It depends what you’re brewing for.
This is where roast origin starts to matter for taste, not just for troubleshooting. A washed, high-altitude bean with naturally bright acidity will show that brightness more at a slightly coarser setting, while a heavier-bodied natural-process bean tends to reward a touch finer. Extraction time plays into this too: a brew that finishes right around the 4 to 5 minute mark tends to taste balanced, while one that runs a full minute longer at the same setting will taste noticeably flatter and more one-note, even before it crosses into outright bitter.
The takeaway is that grind size in a moka pot works more like a dimmer switch than an on/off toggle. Small movements change the character of the cup well before they create an obvious defect.
Does Bean Freshness Affect the Ideal Grind Size?
Yes, and it’s one of the more overlooked variables in moka pot brewing. Freshly roasted beans release carbon dioxide for days to weeks after roasting, a process called degassing, and that trapped gas changes how water interacts with the grounds during brewing.
Very fresh beans, especially anything roasted within the last few days, tend to release more gas during brewing, which can push back against water flow and make the same grind setting behave slightly coarser than it would with rested beans. Beans that are several weeks old and losing gas and aromatic compounds tend to extract faster and thinner at that same setting, since there’s less resistance from off-gassing and less soluble material left to pull.
Practically, this means the “right” setting for a bag you opened last week might drift slightly as that same bag ages over the following month. If your moka pot coffee tastes noticeably different halfway through a bag despite an unchanged grind setting, stale beans are a more likely explanation than a grinder problem. This is also the core argument for buying smaller quantities more often rather than stockpiling beans, since a grind setting dialed in for week-one freshness won’t necessarily hold at week five.
What Grinder Should You Use for Moka Pot Coffee?
Burr grinders are the only realistic option if you want repeatable results. Burr grinders crush beans between two abrasive surfaces to a consistent particle size, while blade grinders essentially chop beans with a spinning blade, producing a wide, uneven mix of dust and chunks in the same batch.
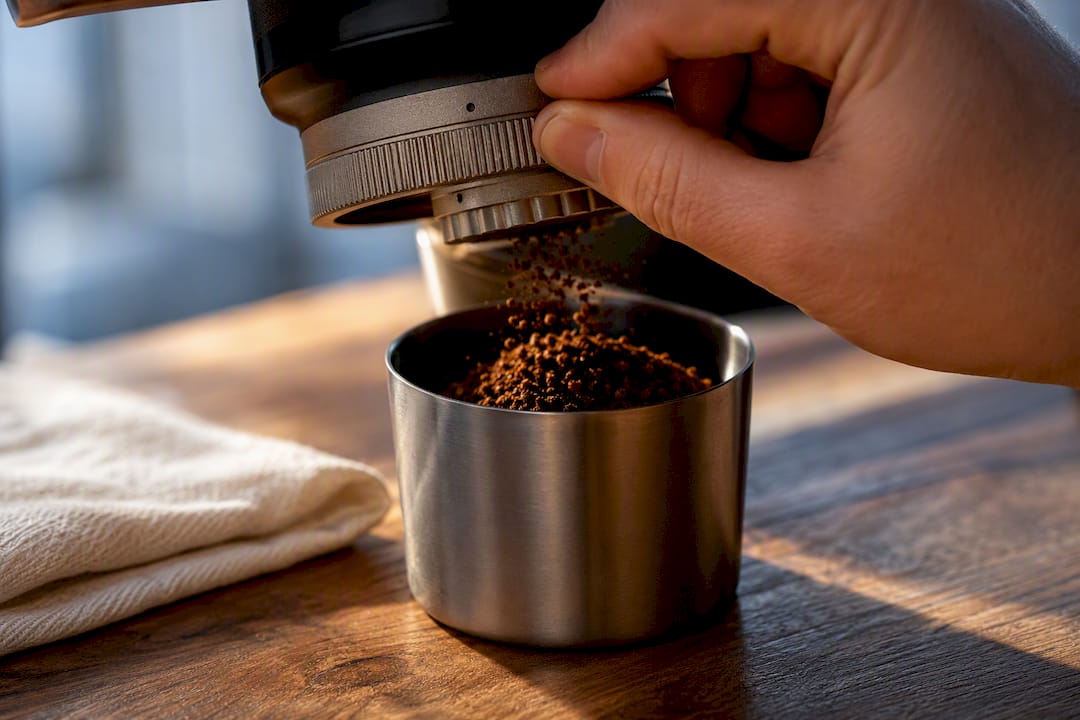
That inconsistency matters more for moka pots than people expect, since the pot’s narrow pressure margin has little tolerance for a grind bed that’s part fines and part boulders. The fines clog and over-extract while the boulders under-extract, and you end up with a cup that’s simultaneously bitter and thin, which is a genuinely confusing result to troubleshoot if you don’t know your grinder is the root cause.
Within burr grinders, both flat-burr and conical-burr designs work fine for moka pot brewing. Flat-burr grinders, common in machines like the Baratza Encore, tend to produce a slightly more uniform particle distribution at a given setting. Conical burr grinders, common in manual hand grinders like those from Timemore, are often more affordable and perfectly capable of hitting a good moka pot grind, just with a bit more click-to-click variability between units of the same model.
If you’re set on a manual grinder for portability or cost, expect to spend more time dialing in initially, since manual grinders often have coarser adjustment increments than higher-end electric models. That’s a reasonable tradeoff for most home brewers, not a dealbreaker.
When Precision Matters and When It Doesn’t
Dialing in grind size to the click genuinely changes the cup, but it doesn’t matter equally on every morning. If you’ve got five minutes and you’re making coffee for yourself or someone who cares about the difference between a bright, floral light roast and a heavy, chocolatey dark one, the dial-in process pays off. That’s where medium-fine, fine-sand grinding earns its keep.
There are mornings, though, where convenience wins and that’s a legitimate choice, not a compromise to feel bad about. Pods remove the grind variable entirely, which is exactly the point of that format. You lose the ability to fine-tune extraction, but you gain consistency without touching a burr grinder before your first cup of coffee.
Neither approach is more “correct” coffee brewing. One optimizes for control, the other for speed.
— Shawn Lee
Choose Whole Beans for Your Moka Pot
For a nutty medium roast, choose Brazil Classic. For a fuller cocoa-led cup, try Cascades, our medium-dark house blend. Select Whole Bean and grind for your moka pot.
Flathead Valley is sold as a 12-pod box for K-Cup-compatible brewers. It is not a moka-pot product, and we do not offer the same Flathead Valley coffee as a whole-bean bag. Compare the roast and tasting notes of our bagged coffees to choose a suitable alternative.
Sources
- Do I need to use a tamp if using a Moka pot / stove-top espresso maker? - Coffee Stack Exchange
- Moka Pot Grind Size: The Complete Extraction Science Guide | Coffee Gear HQ
- Moka Pot Guide: Instructions, Ratio, and Stovetop Espresso Tips | BrewMark
FAQ
What Grind Is Best for a Moka Pot?
A medium-fine, fine-sand grind works best, roughly 360 to 660 microns, coarser than espresso grind and finer than standard pour-over.
What Happens if You Grind Too Fine for a Moka Pot?
Grinding too fine causes clogging and over-extraction, since the moka pot’s 1 to 2 bars of steam pressure can’t push water through a dense, packed bed the way an espresso machine can, often resulting in a stalled or bitter, ashy brew.
What Happens if You Grind Too Coarse for a Moka Pot?
The brew moves through too fast, pulling a thin, watery, and often sour cup because the water doesn’t stay in contact with the grounds long enough to extract fully.
Can You Use the Same Grind Setting for Every Roast Level?
Not reliably. Dark roasts usually need a slightly coarser setting than light roasts, since dark roasts produce more fines that can choke flow at the same setting.
Do You Need a Burr Grinder for Moka Pot Coffee?
A burr grinder is strongly preferred, since it produces a far more consistent particle size than a blade grinder, and that consistency is what keeps moka pot extraction predictable brew after brew.
Recommended
This article was produced by the Purelight Coffee team. It’s general coffee and brewing information, not professional or medical advice - results will vary with your equipment, water, and beans.


