

Yes, espresso at home is realistic, but not without the right grinder. A cheap grinder is the single biggest reason home shots taste sour, thin, or bitter no matter how good the machine is. Start with a standard dose and shot yield, typically about twice the dry coffee weight, pulled in roughly 25 to 30 seconds. If you’re not ready to buy a machine, an AeroPress or Moka pot gets you close enough to enjoy the ritual without the investment.
TL;DR:
- Using a high-quality burr grinder is essential, as uneven grounds from cheap grinders cause poor extraction and bad-tasting espresso.
- A budget of $400 to $700 typically provides a machine with quick heat-up and stable temperature, paired with a decent burr grinder for best results.
- Dialing in your shot requires weighing coffee, adjusting grind size incrementally, and recording parameters until you achieve consistent extraction in 15 to 30 attempts.
- Alternatives like AeroPress, Moka pot, and French press can produce strong, espresso-style coffee without pressure-based machines, suitable for different needs and budgets.
- Regular maintenance, including burr cleanings, backflushing, and descaling, is crucial for consistent quality, and fresh beans significantly improve flavor and aroma.
Table of Contents
- What Counts as Real Espresso at Home?
- What to Buy First for Espresso at Home
- How to Pull Your First Shot and Dial It In
- What to Make Without an Espresso Machine
- Fixing Common Espresso Problems
- Where Purelight Coffee’s Sourcing Fits Into Your Setup
- What I’d Buy First if I Were Starting Today
- Beans and Pods Worth Starting With
- Sources
- FAQ
What Counts as Real Espresso at Home?
Espresso is not just strong coffee. It’s coffee extracted under roughly 9 bars of pressure, forcing hot water through a compact puck of finely ground coffee in a short window. That pressure is what produces crema, the tan foam layer on top, and it’s what separates true espresso from a Moka pot or French press, both of which brew at atmospheric pressure. The standard starting recipe most baristas teach beginners is 18 grams of ground coffee in, yielding 36 grams of liquid espresso out, in 25 to 30 seconds. That’s a 1:2 ratio, and it’s a reasonable anchor point before you start adjusting for your beans.
Making espresso at home the right way involves real trade-offs. A machine and grinder cost money upfront and demand a learning curve that can take several weeks. Alternative brewing methods trade some of that pressure-driven character for speed, low cost, and forgiveness. Neither path is wrong. It depends on whether you want the actual espresso experience or just a strong, concentrated cup that works in milk drinks.
The methods this guide covers, in order of how close they get to true espresso:
- Espresso machine with a burr grinder — the real thing, pressure and crema included
- AeroPress — a concentrated, filtered shot substitute, no pressure but surprisingly close in strength
- Moka pot — steam pressure brewing, stronger than drip but not true espresso
- French press strong steep — the least authentic but the cheapest and fastest to learn
Brew temperature matters more than most beginners expect. Most machines target 195 to 205°F with pressure holding near 9 bars, and drifting outside that window is a common, invisible cause of bad shots that has nothing to do with your grind.
What to Buy First for Espresso at Home
Buy the grinder before you obsess over the machine. This is the part almost every beginner gets backwards, and it’s the fastest way to waste money. A capable burr grinder is the single most important upgrade in a home espresso setup, and the advice from experienced home baristas is blunt: spend at least as much on the grinder as you do on the machine. A blade grinder or a cheap built-in grinder produces uneven particle sizes, and uneven grounds mean water finds the path of least resistance through your puck. That’s channeling, and it ruins extraction no matter how expensive your machine is.
Here’s the priority order for your first setup:
- Burr grinder — get one with stepless or fine-stepped adjustment; espresso needs finer resolution than drip grinders offer
- Espresso machine — even an entry-level machine with a functioning pump and PID temperature control will outperform a great machine fed bad grounds
- Digital scale — accurate to 0.1 grams; you’ll weigh both your dose in and your shot out
- Tamper — matched to your portafilter basket size, usually 51mm or 58mm
- Knock box and cleaning brush — small purchase, saves your counter and your grinder burrs
A precise scale is one of the fastest ways to get consistent shots, because eyeballing dose or yield introduces variance you can’t diagnose later. Once you’re weighing both ends of the shot, half your troubleshooting problems disappear.
Budget tiers break down roughly into entry-level machines paired with affordable burr grinders in the lower cost range. You’ll get drinkable espresso, but dialing in takes patience and the machine’s heat-up time will test you.
$400 to $700 total: This is the sweet spot for most home baristas. A machine with a flash-heat system like ThermoJet combined with a mid-tier electric burr grinder gets you fast heat-up, stable temperature, and grind precision that actually matters. Machines like the Breville Bambino Plus fall in this range and are frequently recommended for exactly this reason.
Higher-end setups feature dual boilers or heat exchanger machines with precise temperature control paired with quality grinders, focusing on workflow and consistency rather than guaranteed taste improvements over intermediate setups.
Pro Tip: A mid-range grinder feeding a cheap machine will consistently outperform a premium machine fed by a mediocre grinder. If your budget forces a choice, protect the grinder line item first.
How to Pull Your First Shot and Dial It In
Warm up your machine fully before you touch a bean. Most home machines need 15 to 20 minutes to stabilize the group head temperature, and a cold portafilter will sabotage an otherwise perfect shot. Run a blank shot—water through an empty, locked-in portafilter—to flush the group head and help bring the machine to operating temperature.
Here’s the actual workflow once you’re warmed up:
- Weigh 18 grams of whole bean coffee on your scale
- Grind fresh, right before the shot, straight into your portafilter basket
- Distribute the grounds evenly across the basket, using a finger swirl or a distribution tool to break up clumps
- Tamp firmly and level, applying consistent, even pressure straight down
- Lock the portafilter into the group head immediately
- Start your shot and your timer at the same moment
- Watch the yield, stopping the shot at 36 grams of liquid espresso in the cup
- Check your time: Aim for a shot duration roughly between 25 to 30 seconds for that yield
If your shot runs faster than 25 seconds, your grind is too coarse. If it crawls past 30 seconds and barely reaches 36 grams, it’s too fine. Either way, resist the urge to change your dose, your tamp pressure, and your grind all at once. That’s the mistake that keeps beginners stuck for months.
The fix is a simple dial-in loop: lock your dose at 18 grams, adjust grind size by one click at a time, pull a shot, and record the result. A disciplined version of this protocol gets most beginners to consistent, balanced shots within 15 to 30 attempts, which for most people who pull one or two shots a day works out to roughly one to two weeks of daily practice. Write down grind setting, dose, yield, and time for every shot. This sounds tedious. It’s the only thing that actually works, because espresso has too many variables to hold in your head after the third cup of the morning. For a deeper look at ratios beyond the standard 1:2, a coffee brew ratio reference is worth bookmarking once you’re comfortable with the basics.
What to Make Without an Espresso Machine
You don’t need a machine to get a strong, espresso-style shot that works in a latte or cappuccino. Each of these alternatives has its own technique, and none of them replicate true pressure extraction, but all three are worth knowing.
- AeroPress, inverted method: use a fine grind, roughly 15 to 18 grams of coffee to 60 grams of water, steep for 1 minute, then press slowly over 30 seconds. The result is thick, concentrated, and filtered clean, which makes it genuinely good in milk drinks even though it lacks crema.
- Moka pot: Use a medium-fine grind and moderate heat to brew with a stovetop pot, removing it from heat when brewing is complete to avoid bitter flavors. High heat scorches the coffee and produces a burnt, bitter cup. Pull it off the burner the moment you hear a hissing, sputtering sound, which signals the water is nearly through. A full walkthrough on brewing espresso-style coffee in a Moka pot covers heat control in more detail if you want to get this right on the first try.
- French press, strong steep: use a fine to medium-fine grind at double your normal ratio, roughly 1 gram of coffee to 8 grams of water, and steep for 4 minutes before pressing. This produces a thick, full-bodied concentrate that works surprisingly well under steamed milk, even though it carries sediment that true espresso doesn’t.
Alternatives like these are genuinely valuable rather than lesser substitutes. AeroPress travels well and stays consistent, a Moka pot needs no electricity and works on any stovetop, and a French press strong steep is the fastest way to get something drinkable when you own zero specialty gear.
Fixing Common Espresso Problems
Most bad shots trace back to one of four symptoms, and each one has a specific, boring fix. Boring is good here. It means the problem is solvable without buying anything new.
| Symptom | Likely Cause | Fix |
|---|---|---|
| Shot runs too fast, watery | Grind too coarse | Grind finer, one click at a time |
| Shot crawls, barely drips | Grind too fine | Grind coarser, one click at a time |
| Sour, sharp taste | Under extracted | Grind finer or raise dose slightly |
| Bitter, harsh taste | Over extracted | Grind coarser or lower brew temperature |
| Uneven, spraying stream | Channeling from poor distribution | Redistribute and tamp more evenly |
The single rule that fixes most of this faster than anything else: change one variable at a time. Adjust grind, pull a shot, taste it, and write down what changed. Adjusting grind, dose, and tamp pressure simultaneously means you’ll never know which change actually fixed anything, and you’ll be guessing indefinitely instead of learning.
Daily and weekly habits matter more than people expect:
- Purge your grinder burrs briefly when switching between roast levels, since oils and fines build up fast on darker roasts.
- Backflush your machine’s group head weekly if it supports it, and wipe down the shower screen after every session.
- Descale according to your machine’s manual, more often if your water is hard.
- If bitterness lingers even in a well-pulled shot, a small dose of a natural sweetener can round out the finish. Natural coffee sweeteners are worth trying before you assume your extraction is the problem.
A quick log, even a notes app entry with grind setting, dose, yield, and time, turns guesswork into pattern recognition within days.
Where Purelight Coffee’s Sourcing Fits Into Your Setup
Purelight works with a roasting partner in Bend, Oregon. Choose by the roast, tasting notes and format on the product page, then review our production and delivery estimates. Our Sourcing & Testing page explains component cupping scores and the sample-specific scope of available lab reports.
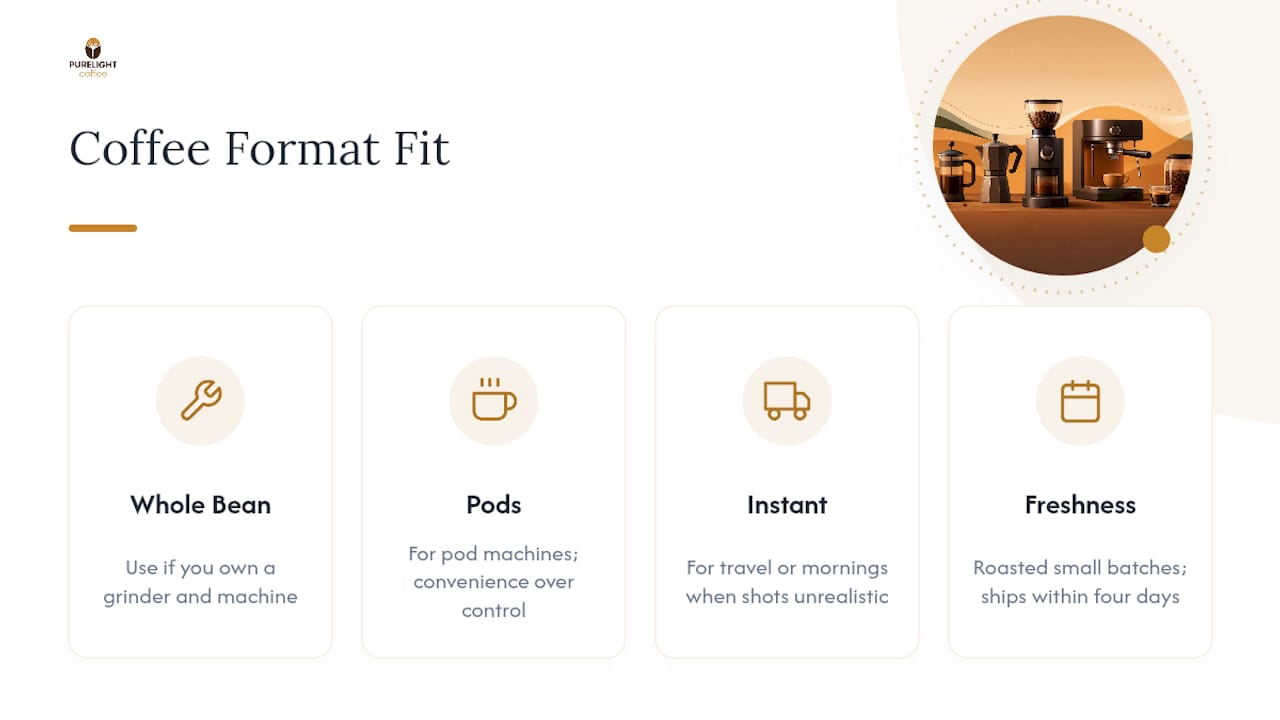
Match the format to your equipment. Whole beans let you set the grind for an espresso machine, AeroPress or moka pot. K-Cup-compatible pods need a compatible pod brewer. Instant coffee dissolves in water. Compare the roast, origin, processing and tasting notes that apply to the coffee you choose; instant coffee does not carry a coffee cupping score.
What I’d Buy First if I Were Starting Today
If I were starting from zero, I’d buy the grinder before I even looked at machines, then commit to two weeks of daily shots before judging anything. Expect 15 to 30 attempts before shots taste consistently good, not great on day one. If your goal is genuinely learning espresso as a skill, the investment is worth it. If you just want a strong, milk-friendly coffee with minimal fuss, an AeroPress or Moka pot will serve you better than a machine you resent maintaining. I’d rather see someone master a $40 Moka pot than abandon a $600 machine in a closet after a rough month.
— Shawn Lee
Beans and Pods Worth Starting With
Purelight Coffee’s lineup gives you a direct path once your gear is sorted. If you’re pulling shots daily with a grinder and machine, Smith River is a medium roast house blend built for exactly that kind of routine practice, forgiving enough for a beginner’s dial-in loop but with enough body to reward better technique as you improve. If you prefer a fuller, darker cup, Cascades is the medium-dark house blend, roasted for that cocoa and toasted-nut character without tipping into ash. Neither bag has a farm-level lot attached, since sourcing at this level works at the regional blend tier, but both list origin and processing detail on the product page.
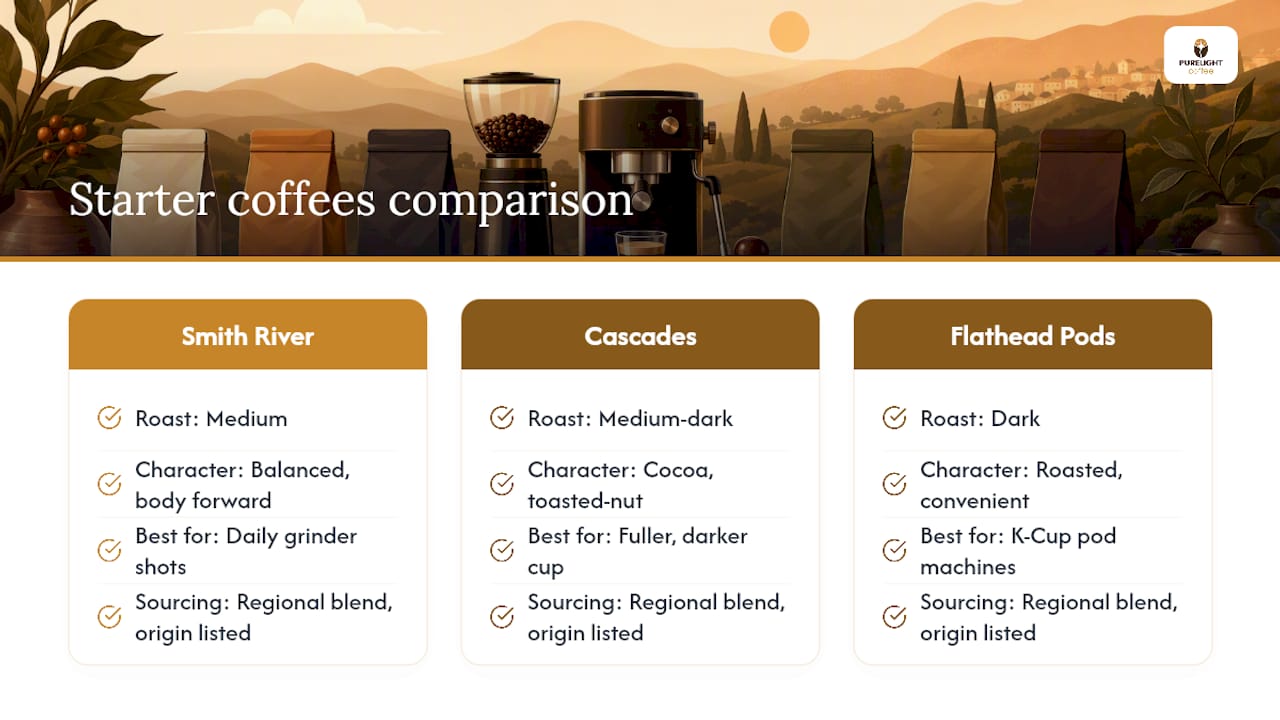
If you use a K-Cup-compatible machine, Flathead Valley dark roast pods are another option. These pods do not fit an espresso machine. Eligible subscriptions save 15% on every subscription order, including the first, and renew automatically until cancelled. Use the management link in your emails before the next scheduled charge, or contact us for help. See subscription terms and options.
Comparing two house blends
Choose any two 12 oz bags from our house blends for $42.95 as a one-time purchase. Mix Smith River, High Lakes and Cascades in whole bean or ground.
One pair offer per order, on one-time purchases only. Subscription items are excluded. Offers cannot combine with discount codes or other automatic discounts; the best eligible offer applies. Prices are in USD, plus applicable tax. Free U.S. shipping.
Sources
- How to Make Espresso at Home: The Complete Beginner’s Guide (2026)
- Best espresso machines and testing notes — Serious Eats
FAQ
How Can I Make Espresso at Home?
Weigh 18 grams of fresh-ground coffee, tamp it evenly into your portafilter, and pull a shot targeting 36 grams of yield in 25 to 30 seconds. A capable burr grinder matters more than the machine itself.
Can I Make Espresso at Home Without a Machine?
Yes. An AeroPress using the inverted method or a Moka pot on low to medium heat both produce a strong, espresso-style shot that works well in milk drinks, though neither replicates true pressure extraction.
Can I Make Espresso With Regular Coffee?
Regular drip-ground coffee is too coarse for an espresso machine and will produce a fast, watery, under-extracted shot. You need coffee ground fine and fresh, ideally from a burr grinder set to espresso fineness.
How Do I Make Good Espresso at Home?
Start with the 18g in, 36g out, 25 to 30 second recipe, then dial in by changing your grind size one click at a time while keeping your dose fixed. Most beginners reach consistent shots within 15 to 30 attempts, often around one to two weeks of daily practice.
Recommended
- Single Origin Espresso for Home Baristas: How to Dial In
- A Moka Pot Makes Espresso-Style Coffee Without the Machine
- Freshly Roasted Coffee: When to Drink It, How to Buy It
This article was produced by the Purelight Coffee team. It’s general coffee and brewing information, not professional or medical advice - results will vary with your equipment, water, and beans.


